Macros are software applications that run inside other
applications, like Office packages. In fact, many commercial
software's now include some form of end-user programming to allow
for customization and automations of common tasks. Microsoft's VBA
(Visual Basic for Applications) is the macro language bundled into
Office and currently licensed to many other software makers.
They are very useful to extend the usefulness and productivity of
the Office applications. As an example, in this website you can
find, among others,
Macros that
build calendar plans using Excel and no extra software.
Macros exist for all current Office applications, but only the
most recent versions of Outlook (from 2000) support them (previous
version have a different programming model). This article will
use EXCEL for illustrations purposes, but in general its
concepts will apply to all Microsoft® Office Applications.
Setting Macro Security
Macros are potentially dangerous. Since they are
software and run by the PC user, they can do almost anything on the
computer they're running, including erasing the hard drive and other
forms of damage. And since they are imbedded in office applications,
they can be mailed as regular office files. In fact, one of the
first virus to use email to spread was the
Melissa Virus, a Word Macro! Of course, back in 1999, email
virus were just starting and nobody expected them, so email was
considered safe and no defenses were in place.
Click here for a full article on Office macro security in this
website.
IMPORTANT NOTE: If you have trouble running macros when
following this article, please refer to the article above and adjust
your security settings before proceeding.
Automation and Coded Macros
There are basically two types of macros, even if the system
itself won’t make a difference between them. The difference is,
really, in the usefulness and extent of the macro:
- Automation macros are macros that automate a
set of manual operations – allowing users to avoid having to
manually repeat an operation. These macros are usually not coded
but recorded, using the Macro Recorder.
- Coded macros are macros that are written by
software developers and that, in reality, are peaces of software
that run (and require) a hosting application to run – Like
Excel.
For an example of a Coded macro, that is too complex to be
generated by recording an example, click here to download the demo
of our Calendar Plan Generator macro.
This article is about generating Automation macros, the ones that
ANY user can create, even if they don’t write a single line of
software!
Generating your own automation Macros
To generate a Macro, first you need an operation to be performed.
As an example, lets generate a macro that:
- Applies a light border to the all selected cells
- Applies a heavier border to the outline (outer border)
of the selected cell
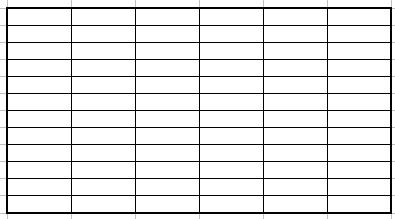
PIC 1 – Macro effect on Excel cells
To record a macro that performs this operation, you only need to
do it yourself while having the Macro Recorder activated (to record
your operations):
1) Select a cell area (you have to do it before you start
recording, otherwise your selection will be saved on the macro
and will always be repeated – not very useful, you want the
macro to apply to any cell selection)
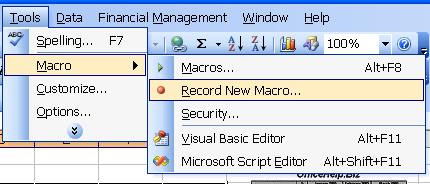
2) On the Tools menu, select Macro and “Record New Macro”:
- Give the Macro a meaningful name (related do
function) like “Grid Maker”
- Assign a Shortcut Key so that the macro can be
invoked later from the keyboard (lets use M)
- Leave the Store Macro In option in its default
setting: In this Workbook
- Add a description for future reference
- Click OK
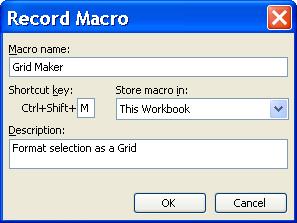
3) Perform the desired operations. In this case:
- Apply a light border to all selected cells
- Apply a heavier border to the outline
4) Click on the stop button of the macro recorder toolbar (PIC):
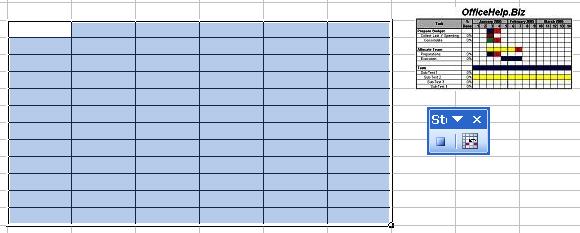
You now have a macro that will apply the border to ANY cell
selection.
Running the Macro
In case you haven’t performed the steps above, just use our ready
to use demo:
Click
here to download this TIP FREE demo
To run the macro, you have several options:
- Use the Keyboard shortkey (only if you have defined one, not
all macros have them): Pres CTRL + (SHIFT ) + Macro key (in
our sample, CTRL + SHIFT + M)
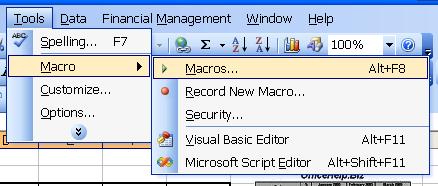
- Run it from the Tools Menu: Select Macros, Macros again.
- Choose your macro
- Click on the Run Button
Editing the Macro Code
If you know VBA (or Visual Basic, VBScript or any
other related language) you may want to manually edit
the macro. Or you may just be curious about what was exactly
recorded by the macro. To open the macro editor, press
ALT+F11 on your keyboard. You will enter the Macro
Editor:
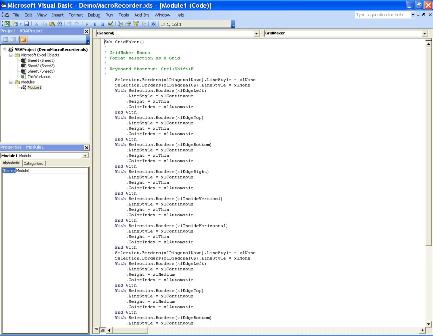
PIC 6: Macro (VBA) Editor (Click to
Enlarge).
Recorder Macros usually reside on Module1, on the
Modules section. One useful manual addition to your
code (that cannot be done with the recorder) is adding a message box
to indicate the macro has finished. Add a line to the end of your
macro code (before the “End Sub”) with
MSGBOX “The macro nnnnn has finished”, vbOKOnly, “MY
MACRO TITLE”
Where nnnnn is the name of your macro. The general format for
this command is:
MSGBOX “message body”, button codes, “TITLE”
Check the DEMO for an example.
Click
here to download the DEMO
You may experiment with changing the code. To avoid
destroying it, you may save the original macro, create a
copy and edit the copy. If you end up with an unusable macro,
you may just delete the copy and make a new one from the original
macro.
Saving the Macros for future use
Macros are usually saved with the file where they were recorded.
This mean they will also be available on that file, regardless of
the computer used to open it. So, if you email the file to a friend,
the macro will be there.
To save the macro with the file, just save the file with the
Save
command. It will be saved with your data and all other file contents
(Charts, formats, etc).
Saving the macro as a AddIn: For use in multiple files
This option may not be available for all Microsoft Office
applications, but is available in Excel. You may save your macro as
a AddIn that its loaded with Excel every time it starts. This
way, if the macro is generic and can be useful in many files, it
will always be available regardless of the file currently being
edited.
The drawback is that in this format, the macro behaved as an Excel
extension on that computer and, therefore, will not be available on
other computers (unless specifically installed on them) and will not
travel with the data files (if you email a file to a friend, the
macro will not be there for him because it is installed on your PC,
not the data file).
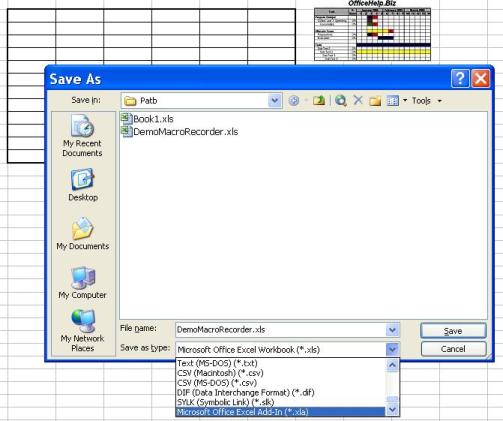
To save it as an AddIn, do this:
1) Select Save As on the File menu
2) On the “Save as Type” box select “Microsoft Excel Add-In (*.xla)”
3) On the most recent versions of Excel, you will be automatically
positioned on the AddIns folder. On versions prior to 2000, you need
to find the AddIns folder yourself
4) Give it a name and save it
From now on, your addin will load with Excel and the macro will be
available every time you run Excel, but only on the PC where it has
been saved.
To install it on other computers, just mail them the original Excel
macro file and repeat the steps above on each one.
Try the FREE Demo
In case you haven’t performed the steps above, you
may still experiment the usefulness of macros. Just use our ready to
use demo:
Click
here to download this TIP FREE demo
Can I know more about this subject ?
Check our FREE PC Tips.
They will be
regularly published. Better still,
subscribe our
Email Newsletter. You will be informed when contents updates are
made and automatically granted participation on any future
promotion.
|

