Most Microsoft (R) Office application can automatically save
recovery information that can be used to recover the file you were
working when it failed. Regardless of the cause of the failure
(power outage, computer freeze (commonly referred as "application
crash") or any other) it will be possible to recover the
document from the point of the last automatic save.
In this PC Tip, we will consider and illustrate how to do it for Word,
Excel and PowerPoint. Other Office applications may
also have this facility. Search for it on the application Help.
Recovery Information vs File Saves
Autosaving is not similar to pressing the save button every X
minutes. It won't save your file on your filename at the given
interval. Instead, it will save Recovery Information
on a specific file each time the interval limit is reached.
How do you recover a document after a failure? Just open again
the failed application and it should prompt you with the information
that there is a recovery file to be used. You have to accept or deny
opening it. If you accept, the file you were working will open, and you
should save it to a regular file immediatly.
Be careful: Autorecovery will only work the
first time you open the failed application. If you don't recover and
save the file data, it will be lost. Always open your failed
application first thing after you reopen the PC after a failure and
save the data to a regular office file.
In case the recovery file doesn't appear when you reopen the
failed application, you can open it as a regular file. The recovery
file name is, according to Word 2000 Help file: "AutoRecovery save of file
name.asd". The default location is a system folder:
"Windows\Profiles\username\Application
Data\Microsoft\Word" folder where username is your login
name on the PC. This folder is usually hidden, and it's not easy
reaching it. Doing it is outside the scope of this PC TIP. Please
refer to the Office Help file for more information (search for
"Recovery Info").
Choosing the Right Time Interval
You will be requested to enter the time interval between recovery
info saves, in minutes. By default, the suggested interval is 10
minutes long, which is appropriate for most cases. Only in
very specific cases it will be insufficient. You can recover from a
10 minutes loss, can you?
But there are cases where you should enlarge or reduce this
interval. There is a tradeoff to be made:
- Saving recovery info takes its time and uses computer
resources. You will probably be able to identify when it's being
done, even if it's done on the background. If the file is large,
it will consume some time and will affect the machine
performance, even if not by much;
- The shorter the interval, the safer you are about recovery,
but the greater the impact on your work and the PC performance;
If you're working on a normal size document, leave the default 10
minutes interval. On large documents, increase the interval to avoid
a constant performance hit. Try a small increase to see if it is enough
and enlarge again if it still impacts too much your regular work. Don't
increase too much at once, because you're increasing your loss in
case of failure.
If you're working on an unstable machine (with a history of
crashing) or on a sensitive file, with a huge number of changes, and
the file size is manageable, the reduce it to what is viable without
disrupting regular work.
The rule is: leave it on the default 10 minutes
setting unless you have a valid reason to change it, to either
a larger or smaller interval.
How it Works - Step by Step for Word
1) Select Options from the Tools menu:

2) Select the Save separator. Activate the Save AutoRecover info every: and enter the
selected interval in minutes (see above for some rules):

How it Works - Step by Step for PowerPoint
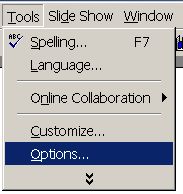
1) Select Options from the Tools menu:
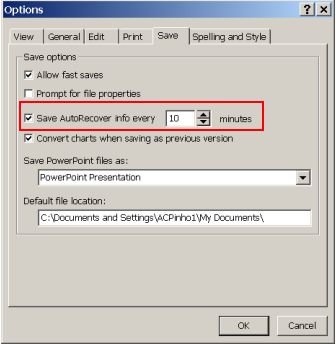
2) Select the Save separator. Activate the Save AutoRecover info every: and enter the
selected interval in minutes (see above for some rules):
How it Works - Step by Step for Excel
Excel is a complicated case. There is no standard option to
AutoSave files. You need to install an Add-In that comes with the installation
CD from Microsoft®. We will show how to install the add-in later,
in case it's not already active.
How to Activate the Autosave after the Add-In is ready:
1) Select AutoSave from the Tools menu:
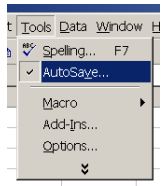
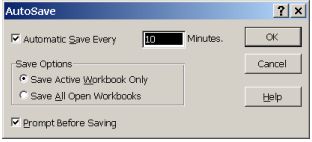
2) Enter the
selected interval in minutes (see above for some rules). We
advise you to turn off the Prompt Before Saving option,
otherwise you'll get a disrupting prompt every time the AutoSave
interval is reached. There is also an option to Save All open
workbooks or only the one you're working. Select the more
appropriated for your work in progress:
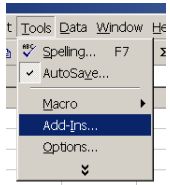
How to install the AutoSave Add-In if it's not present
on the Tools menu:
1) Select Add-Ins from the Tools menu:
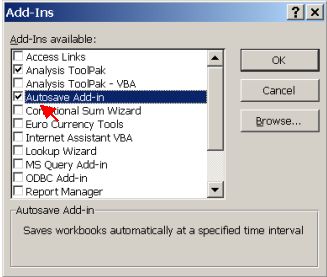
2) Enable the AutoSave Add-In and press the OK button (you may
need the Microsoft® Office installation CD):
Can I know more about this subject ?
Check our FREE PC Tips and Tutorials.
They will be
regularly published. Better still,
subscribe our
Email Newsletter. You will be informed when contents updates are
made and automatically granted participation on any future
promotion.
|

